Step-by-Step Guide to Applying for a Canada Study Visa by Yourself
A Useful Guide: How to Apply for a Canadian Study Permit Online by Yourself.
Congratulations on your acceptance to study in Canada; you are one step closer! Furthermore, it is critical to submit a good, well-prepared, and well-presented visa application….. So, this post is dedicated to you!
If your proposed program of study is longer than 6 months, you will likely need a study permit to study in Canada. But to confirm if you need a study permit, you can do a quick assessment here. After this assessment, check all the documents you need for a study permit here.
You also have to submit your application online and to do this, you need to create an IRCC secure account. You can create this account here.
Except you have a Canadian Bank Account, the “GCKey” account is what you need. Create one and keep your login details.
As I have said in the past, there are 3 key things to keep in mind when applying for a Canadian Study Permit:
- Purpose of study/program
- Availability of funds (without having to work in Canada)
- Strong proof of home ties (that will compel you to leave Canada after your study)
The quality of your documents and how they are presented to show you meet the visa requirements will determine the success of your application.
– Why is this program important & of value to you?
– How will you fund the program?
– Do you have strong/compelling ties outside Canada?
Now login to the GCKey account you created and begin your application. Once you are in your account, you should see a landing page. Look for where it says “Apply to come to Canada” like the image below… click on that.

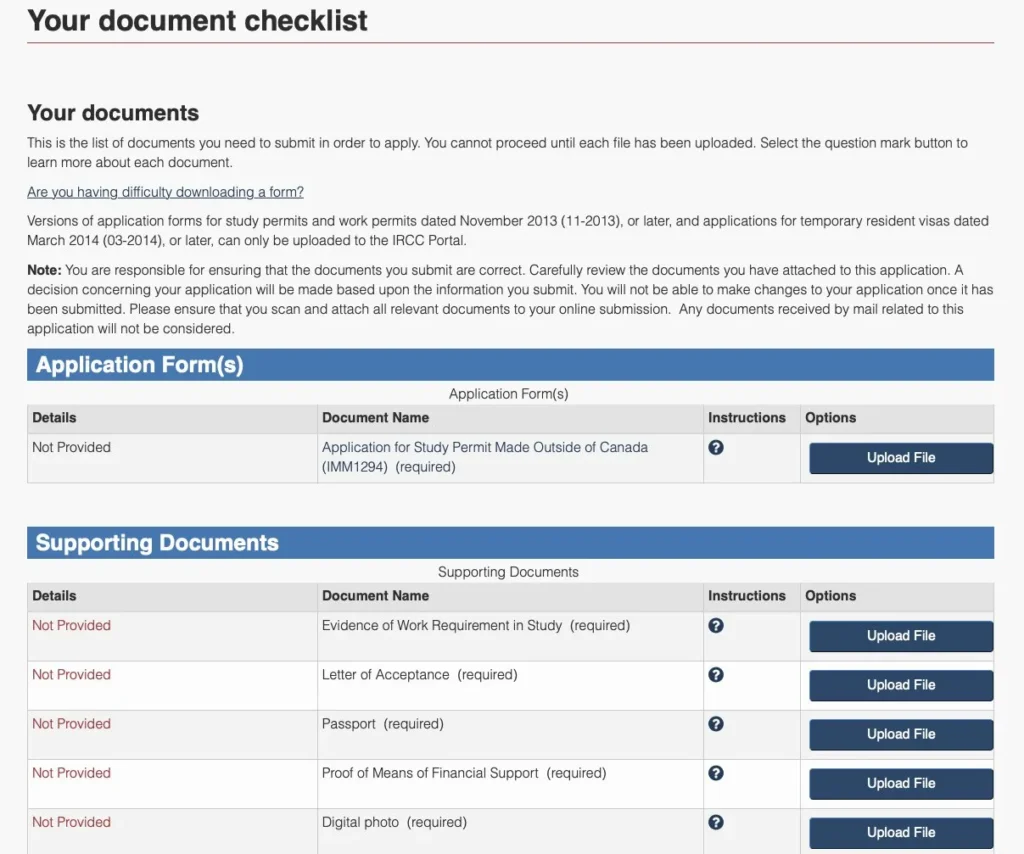
If you do things the right way, and answer the necessary questionnaires correctly, your final visa application portal should be up and you will see the list of application forms and other required documents. These documents are tailored to you based on the answers you provided.
One important thing to note is that the list of documents is tailored to you based on your answers to the application questionnaire, so this is not a general list of documents for everyone. However, there are some common documents you will need.


Some of the common documents are:
Application Forms:
– Application for Study Permit Made Outside of Canada. (IMM 1294)
– Family Information Form (IMM 5645 or IMM 5707)
– Schedule 1 – Application for a Temporary Resident Visa made outside Canada. (Optional but recommended)
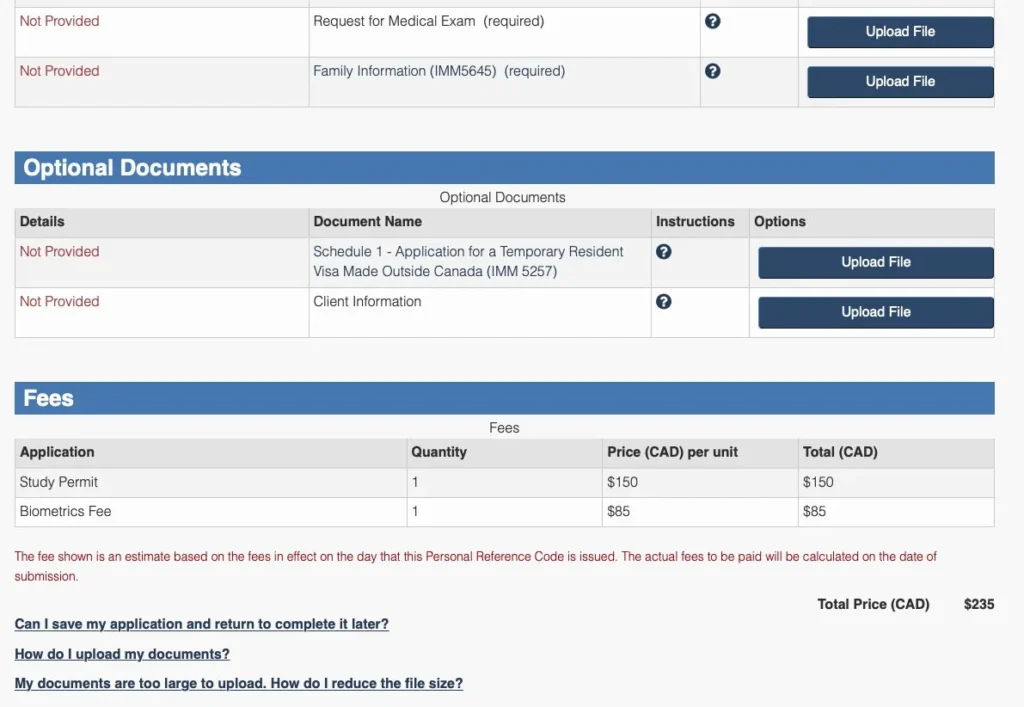
Other documents are:
– Letter of (admission) Acceptance
– Proof of Means of Financial Support
– Digital Photo
– Passport (International Passport)
– Request for Medical Exam (or Proof of upfront medical exam)
– Client information (Letter of Explanation / Statement of Purpose)
The Application Forms:
– Fill the forms as accurately as possible.
– Do not provide false information
– Do not withhold important information
– You do not need to print the forms to sign (just put your name and/or the date below)
– Validate the forms before saving and uploading them back on the placeholder for your document.
The Schedule 1 – (Application for a Temporary Resident Visa) form says optional, but it is a very important form. Fill and submit it as well.
On the Family Information Form, list your siblings & required family members (even if you are not on talking terms with them now), it is important!
Proof of Means of Financial Support
The key thing to note for the proof of means of financial support is to ensure you, and/or all your sponsors have enough to support you and still take care of other financial commitments they have. Therefore, the advisable thing is to show that you have excess funds to defray the cost of your study in Canada.
The total funds you need is the total of your tuition (usually for the first year alone even if your program is more than one year), plus your living expenses in the first year, and other additional expenses (like flight fee).
- For instance, if the total funds you need (for tuition + living expenses + other expenses for yourself or family members accompanying you) is $40,000, show that you still have something extra.
- If you have a scholarship but your scholarship will NOT cover flights and other things, show extra funds for these expenses too.
- If you have family members following you, you have to show that you have enough to cover their living expenses in the first year, plus your own tuition, living expenses, and other fees.
- For the amount of money required for your living expenses and documents to show, you can check the IRCC Website here
After showing that you have enough funds, and funds in excess to cover your fees (tuition, living expenses, other expenses, etc) in the first year, prepare and present other additional assets and sources of income to show where your fees in the second year (and other subsequent years) will come from without having to work in Canada.
While the visa office is typically concerned about seeing the raw funds you have for the first year of your program, they also want to know that you or your sponsors have genuine sources of income to show that you will not be stranded in Canada in subsequent years.
Some of the ways you can show these sources of income are through your personal and economic assets such as:
- Proof of income and investments for the applicant or sponsor(s)
- Property documents with the property valuation or proof of ownership
- Proof of business ownership for the applicant or sponsor(s)
- Employee payslips, proof of employment, proof of annual earnings provided by the employer of the applicant or sponsor(s)
- Letter of employment provided by the employer of the applicant or sponsor(s)
- Other sources of income or economic assets that can be easily disposed to raise funds (rental properties, fixed investment, pension funds, etc)
Add as much as possible of these documents to your statement of account or other proof of funds you are presenting and provide them as part of your proof of funds.
Also, label them and itemize them in your proof of funds cover so that the visa officers can see them clearly, and know how to identify the extra documents in your proof of funds document.
Preferred sponsors are usually:
- Educational Institutions (i.e scholarships)
- You or your spouse
- Your Parents/Partners
- Direct Siblings
- Employers
- Other Close Relatives (who can demonstrate that they are genuinely supporting you)
- Study Loans from reputable organizations
Your sponsors could also be from multiple sources. For instance, you may have
- Partial scholarship + support from parents
- Scholarship + siblings
- Two of your siblings sponsoring you, etc
Your sponsor should not have just the precise amount you need for your tuition and living expenses in their account, they should have that amount in excess of what you need. This is important because it will not be convincing enough to say all they have is what they are giving to you, they have other financial commitments too even if they are your parents.
Digital Photo
The Digital Photo specification is available here.
International Passport
As one document, scan the data page of your current passport, stamped pages/visas, and stamped pages of the previous passport(s) to show your travel history (if you have that).
Medical Exam
You may decide to do an upfront medical exam or wait until you are asked by IRCC to go for one. I recommend doing an upfront medical to reduce the processing times for your application.
If you are a Nigerian applicant and you are using the Nigerian Student Express (NSE) route, the upfront medical exam is compulsory for you.
Other categories of applicants can also do the upfront medical or wait for the IRCC to request for the medical before it is done. Either way, doing an upfront medical or NOT doing one will not affect your application. If your application proceeds to the stage where a medical examination is required, IRCC will send you a letter instructing you to get one done.
If you decide to do the upfront medical examination after your application has been submitted, you can do one and send in your eMedical sheet to IRCC using the IRCC Webform here.
To find where to do the medical exam, visit the IRCC website here.
The Nigerian Student Express (NSE)
If you are looking for information on what the Nigerian Student Express (NSE) is, you can check here
As of today, there is no separate application process for NSE, but you may be contacted after submitting your application to provide some documents for the NSE.
If you are found eligible for the application route. (Please note that using the NSE for your application is optional and not compulsory).
Client Information/Letter of Explanation/SOP/Study Plan
In your application portal, this says optional, but make sure you fill it. This is where to provide additional documents in support of your application. Your Letter of Explanation/SOP/Study Plan, police report, certificates/transcript, resume, etc should go here as a single document.
There are also some things to address in your Study Permit Letter of Explanation/SOP/Study Plan.
First, it must be a clear, concise, and coherent summary of your proposed study plan and any additional clarification/information.
Organize the letter well and use sub-sections to make it presentable.
The Letter of Explanation is what some people also call a Statement of Purpose (SOP) for visa applications.
Some things to address in this letter are:
– An introduction of who you are
– Why the program and the school you applied to?
– Why Canada?
– How the program you are coming to Canada to do will be beneficial to you and your country upon return home
– Clarification on the proof of means of financial support
– Home Ties, Travel Experience, and previous professional experience
For more information on your Letter of Explanation/SOP check this guide here for useful tips.
Keep in mind that every document placeholder in your application will only accept a doc size of 4MB. This is why you should present only relevant documents that will support the success of your application.
For tips on how to resize your documents, check my post on how to resize your documents here.
The process of getting a Canadian study permit is competitive. The quality of all the documents above will determine the success of your application. The refusal rate is high for many reasons, see some of the reasons here.
Canada needs people, but Canada will not accept just anyone. In the article above, you will see some of the refusal reasons that were highlighted, do your best to avoid them.
Information for applicants with a previous refusal
If you have previously been refused a study permit or any form of visa in Canada, your ambition of going to Canada is not over. Each new application is considered on its own merits, and a past refusal does not automatically guarantee you will be denied again.
Do your best to address the concerns raised in your previous refusal, and if you need practical guidance on things to do after a Canadian Visa refusal, check the guidance in the post here.
Importantly, you should submit your Canadian study visa application as soon as possible, but you should also submit a really solid, well-prepared, and well-presented application.
Keep at it, ahead!
Answers to some Frequently Asked Questions (FAQs):
– Yes, you will pay the application fees online
– Police certificate is optional, but try to get it if you can
– Yes, get a letter of sponsorship and/or affidavit of support from your sponsor(s)
– Yes, a letter from your employer is of help to show your home ties
Other FAQs:
– Yes, you can add other assets (after showing the required funds in your bank statement)
– Even if you have a full scholarship, you may still need to show additional funds for the following reasons
- The scholarship payment may not cover other expenses you need to show funds for (i.e your flight, personal device, family members accompanying you, etc)
- The scholarship payment may start a few weeks/months after arriving in Canada (so it is advisable to show that you have some funds to settle in before payment starts).
– Family and employment are also good for home ties. However, some applicants may be able to apply with their families if they meet certain requirements.
- i.e. they have other ties to their countries that are strong
- they are able to show compelling reasons for why their family members must apply with them
- they have enough funds and assets to show they can cater to all the family members accompanying them
– Yes, you can submit a study permit application while under consideration for permanent residence (it is called Dual Intent). You can read more about that here.
– Your biometric is required after submitting your application. (You don’t need another biometric if you’ve done one for an application within the last 10 years).
– Yes, Canada will verify all the documents submitted, and any misrepresentation is a 5-year visa ban.
The processing time for your application will depend on so many things. Every application is unique.
To see the average processing times by country, check the IRCC website here.
I wish you all the best in your application and I look forward to welcoming you to Canada.
If you have any comments, questions, feedback, or need clarifications, send me a DM on Instagram here.
NB: The posts and information on this website are not legal advice.


